“How to Tie a Tie: A Comprehensive Guide to Mastering a Timeless Skill
Related Articles How to Tie a Tie: A Comprehensive Guide to Mastering a Timeless Skill
- How Many Cups In A Gallon? A Comprehensive Guide To Liquid Measurement
- Cloud-based Data Warehousing
- Cloud Data Loss Prevention
- Tiempo: More Than Just Time – A Cultural And Linguistic Exploration
- NFL Scores: A Comprehensive Guide To Staying Updated And Understanding The Game
Introduction
On this special occasion, we are happy to review interesting topics related to How to Tie a Tie: A Comprehensive Guide to Mastering a Timeless Skill. Let’s knit interesting information and provide new insights to readers.
Table of Content
How to Tie a Tie: A Comprehensive Guide to Mastering a Timeless Skill

The tie: a symbol of professionalism, style, and attention to detail. While its origins may be rooted in practicality, today, the tie is a sartorial statement that can elevate an outfit and express your personality. However, the key to unlocking the tie’s potential lies in knowing how to tie it correctly.
This comprehensive guide will walk you through the fundamentals of tying a tie, covering several popular knots, offering style tips, and addressing common questions. Whether you’re a beginner or looking to expand your knot repertoire, this article will equip you with the knowledge and skills to confidently tie a tie for any occasion.
Understanding the Anatomy of a Tie
Before diving into the knots, let’s familiarize ourselves with the basic parts of a tie:
- Blade (or Wide End): The wider end of the tie that typically hangs lower when worn.
- Tip: The very end of the blade.
- Neck (or Narrow End): The narrower end of the tie.
- Keeper Loop: The loop on the back of the tie that holds the narrow end in place.
- Dimple: The slight indentation just below the knot, adding depth and character.
Essential Considerations Before You Start
- Tie Length: Ties come in various lengths. Standard ties are around 57-58 inches, while extra-long ties (62-63 inches) are available for taller individuals. The tip of your tie should ideally reach your belt buckle or slightly overlap it.
- Collar Style: The knot you choose should complement your shirt collar. Wider knots work well with spread collars, while narrower knots suit point collars.
- Tie Fabric: The fabric of your tie can influence the size and appearance of the knot. Thicker fabrics like wool or cashmere will create bulkier knots, while silk ties will produce sleeker knots.
- Mirror, Mirror: Always tie your tie in front of a mirror to ensure proper alignment and symmetry.
The Four-in-Hand Knot: The Beginner’s Staple
The Four-in-Hand is arguably the easiest and most versatile knot to learn. It’s slightly asymmetrical, making it suitable for most occasions, and it works well with a variety of tie fabrics and collar styles.
Step-by-Step Instructions:
- Drape the tie around your neck with the blade (wide end) on your right side, extending about 12 inches lower than the narrow end.
- Cross the blade over the narrow end, forming an "X" just below your chin.
- Bring the blade up and behind the narrow end.
- Bring the blade across the front of the narrow end, from right to left.
- Bring the blade up and through the loop around your neck from underneath.
- Hold the knot loosely and guide the blade down through the loop you’ve just created in the front.
- Tighten the knot by holding the narrow end and sliding the knot up to your collar.
- Adjust the knot and create a dimple by pinching the tie just below the knot as you tighten it.
The Half Windsor Knot: A Step Up in Sophistication
The Half Windsor is a symmetrical knot that’s slightly larger than the Four-in-Hand. It’s a good choice for business settings and works well with most collar styles.
Step-by-Step Instructions:
- Drape the tie around your neck with the blade on your right side, extending about 12 inches lower than the narrow end.
- Cross the blade over the narrow end, forming an "X" just below your chin.
- Bring the blade up and behind the narrow end.
- Bring the blade down and through the loop around your neck on the right side.
- Bring the blade across the front of the narrow end, from right to left.
- Bring the blade up and through the loop around your neck from underneath.
- Guide the blade down through the loop you’ve just created in the front.
- Tighten the knot and adjust for a dimple.
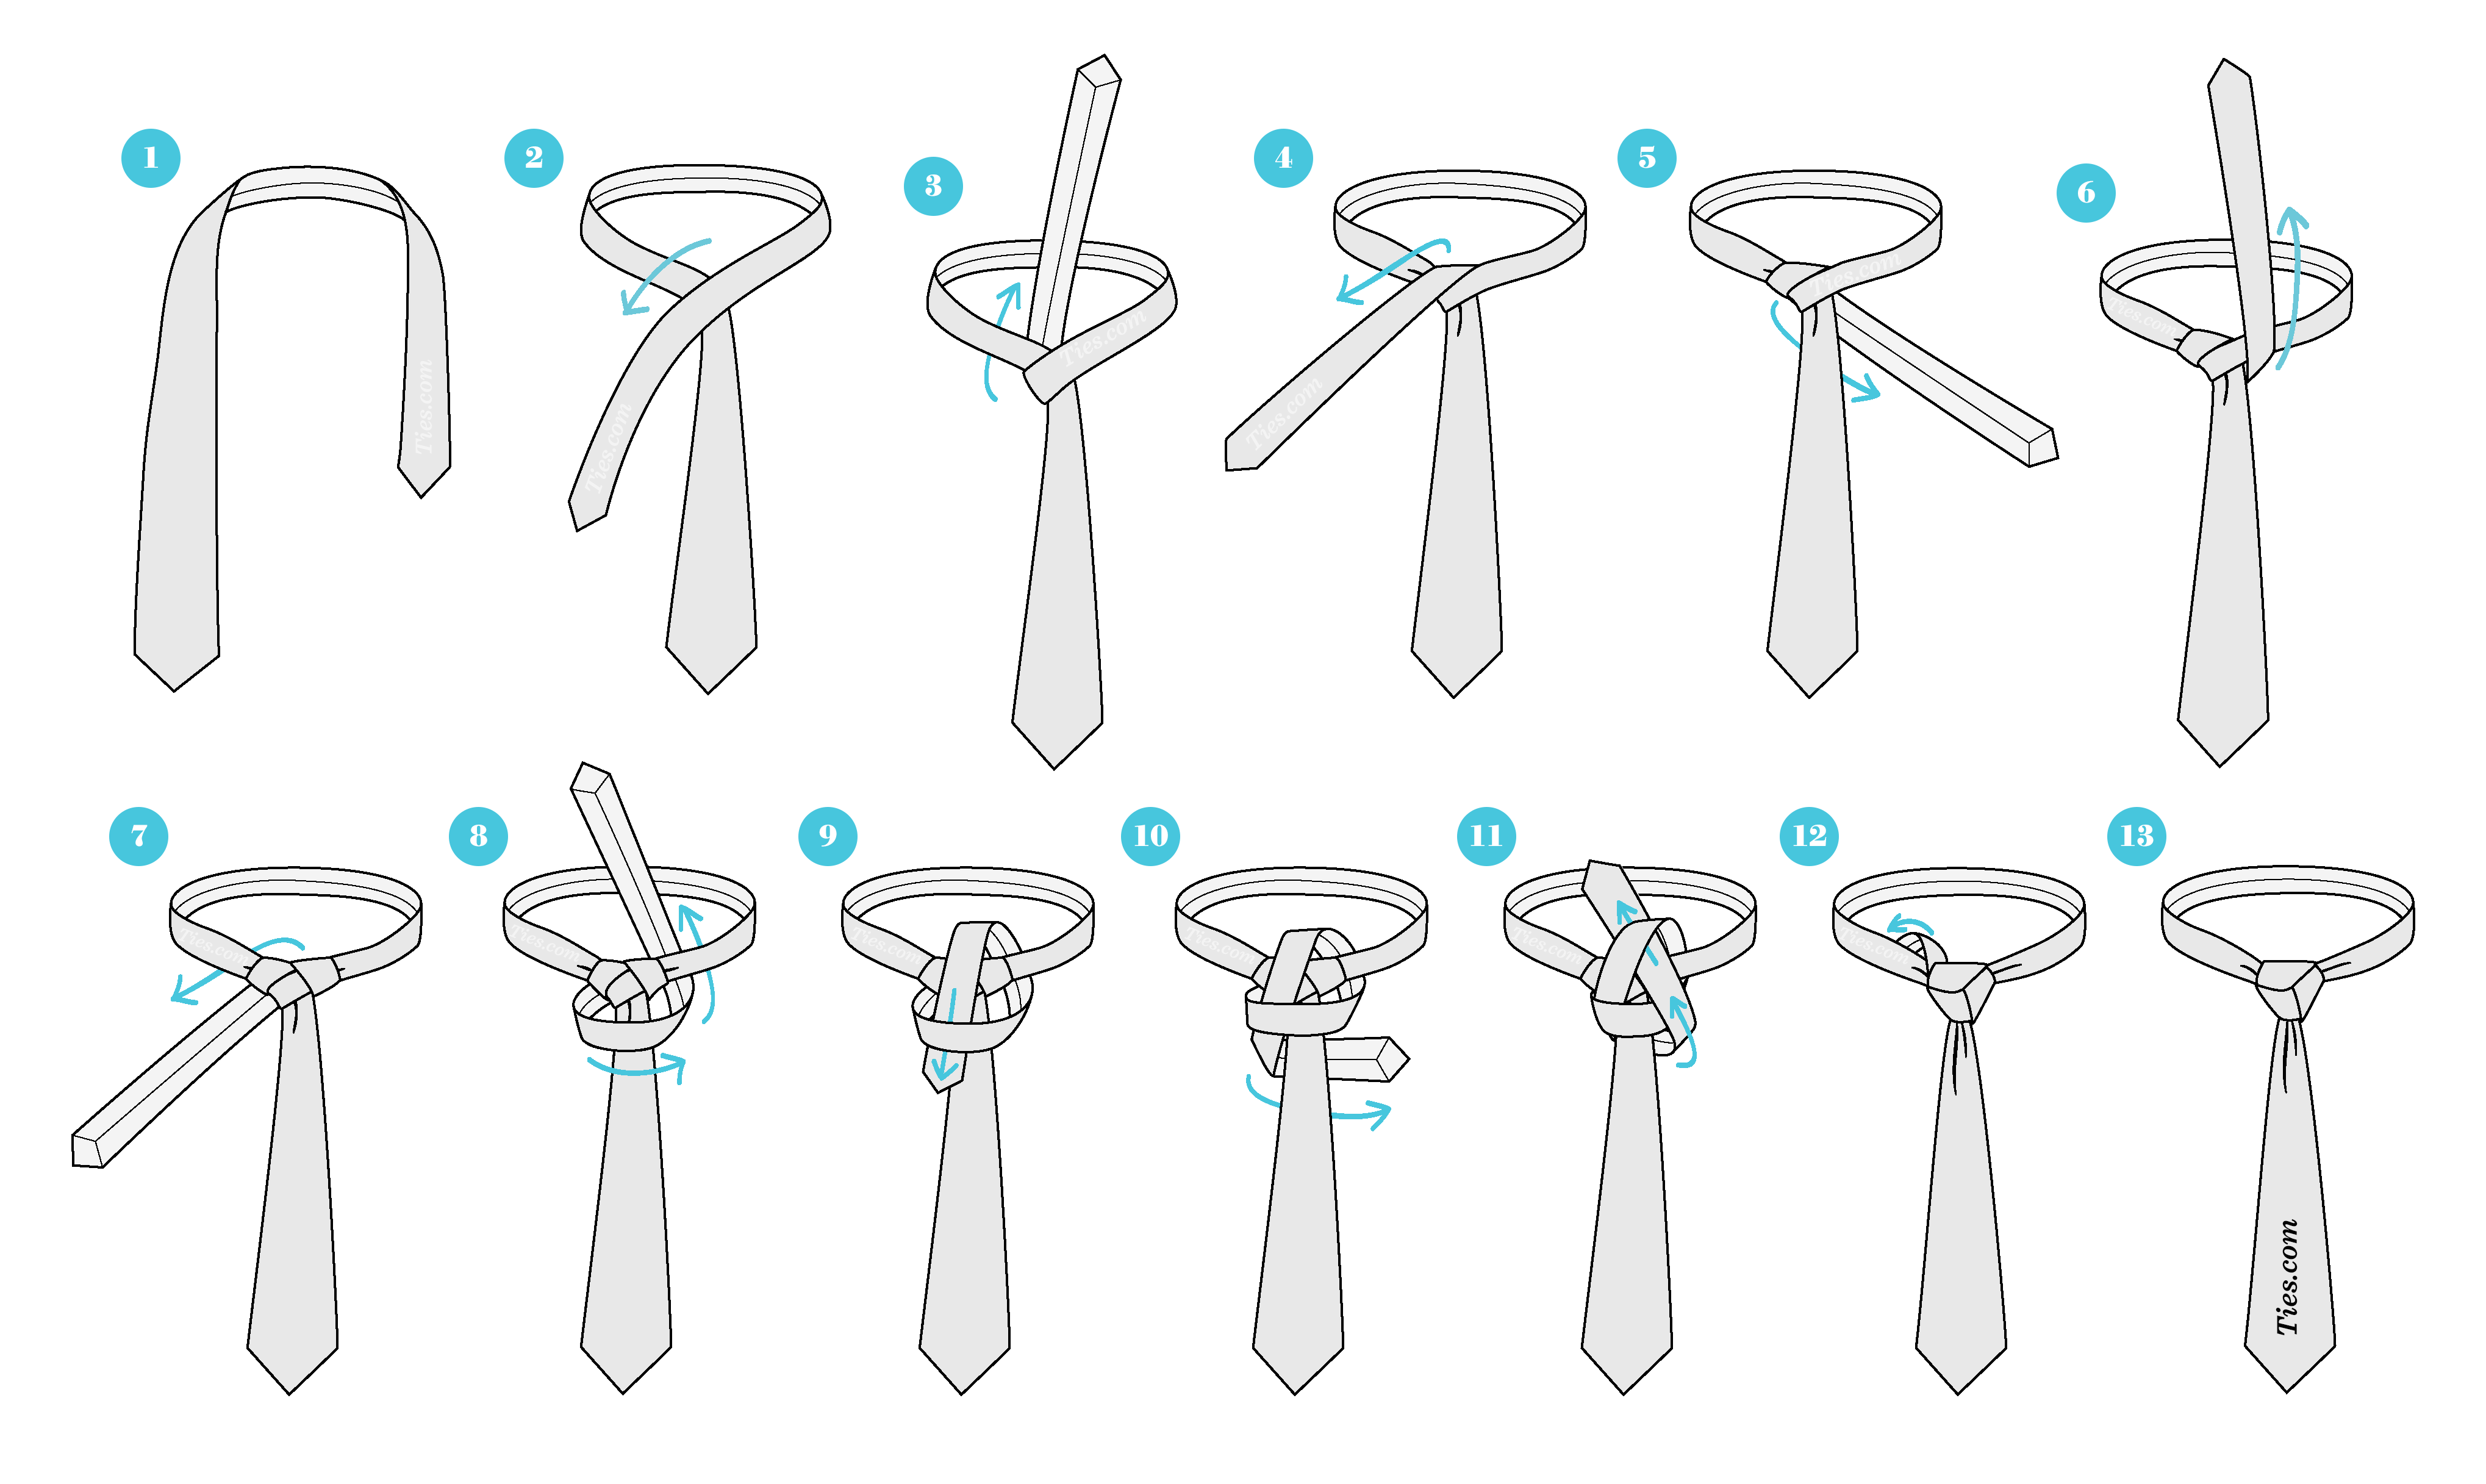
The Full Windsor Knot: The Power Player
The Full Windsor is a large, symmetrical knot that exudes confidence and authority. It’s best suited for spread collars and formal occasions.
Step-by-Step Instructions:
- Drape the tie around your neck with the blade on your right side, extending about 12 inches lower than the narrow end.
- Cross the blade over the narrow end, forming an "X" just below your chin.
- Bring the blade up and behind the narrow end on the left side.
- Bring the blade down and through the loop around your neck on the right side.
- Bring the blade across the front of the narrow end, from right to left.
- Bring the blade up and behind the narrow end on the right side.
- Bring the blade down and through the loop around your neck on the left side.
- Bring the blade across the front of the knot, from right to left.
- Bring the blade up and through the loop around your neck from underneath.
- Guide the blade down through the loop you’ve just created in the front.
- Tighten the knot and adjust for a dimple.
The Pratt Knot (or Shelby Knot): The Understated Option
The Pratt knot is a medium-sized, symmetrical knot that’s slightly smaller than the Half Windsor. It’s a versatile choice that works well with a variety of collar styles.
Step-by-Step Instructions:
- Drape the tie around your neck with the blade on your right side, extending about 12 inches lower than the narrow end. Important: Start with the tie inside out.
- Bring the blade across the front of the narrow end, from right to left.
- Bring the blade up and through the loop around your neck from underneath.
- Bring the blade down and through the loop you’ve just created in the front.
- Bring the blade across the front of the narrow end, from left to right.
- Bring the blade up and through the loop around your neck from underneath.
- Guide the blade down through the loop you’ve just created in the front.
- Tighten the knot and adjust for a dimple.
Style Tips and Considerations
- Dimple Creation: A dimple adds character and sophistication to your tie knot. To create a dimple, pinch the tie just below the knot as you tighten it. Experiment with different dimple styles, such as a single deep dimple or two smaller dimples.
- Knot Size: Choose a knot size that complements your collar style and facial features. Wider knots work well with spread collars and broader faces, while narrower knots suit point collars and slimmer faces.
- Tie Pattern and Color: Select tie patterns and colors that coordinate with your shirt and suit. Solid-colored ties are versatile, while patterned ties can add personality and visual interest.
- Tie Fabric: Consider the fabric of your tie when choosing a knot. Thicker fabrics will create bulkier knots, while thinner fabrics will produce sleeker knots.
- Practice Makes Perfect: Tying a tie takes practice. Don’t be discouraged if you don’t get it right the first time. Keep practicing, and you’ll eventually master the art of tying a tie.
Common Mistakes to Avoid
- Tie Too Short or Too Long: The tip of your tie should ideally reach your belt buckle or slightly overlap it.
- Knot Too Loose or Too Tight: A knot that’s too loose will look sloppy, while a knot that’s too tight will be uncomfortable.
- Uneven Knot: Strive for a symmetrical knot, unless you’re intentionally going for an asymmetrical look with the Four-in-Hand.
- Forgetting the Dimple: The dimple adds depth and character to your tie knot.
- Neglecting Collar Style: Choose a knot that complements your shirt collar.
Beyond the Basics: Advanced Knots
Once you’ve mastered the fundamental knots, you can explore more advanced options, such as the Eldredge knot, the Trinity knot, or the Onassis knot. These knots are more complex and require more practice, but they can add a unique and stylish touch to your outfit.
Conclusion
Tying a tie is a valuable skill that can enhance your personal style and confidence. By mastering the fundamental knots and following the style tips outlined in this guide, you’ll be well-equipped to tie a tie for any occasion. So, grab a tie, stand in front of a mirror, and start practicing. With patience and persistence, you’ll soon be tying ties like a pro.