“How to Take a Screenshot on Mac: A Comprehensive Guide
Related Articles How to Take a Screenshot on Mac: A Comprehensive Guide
- car insurance under 25
- Microsoft Outlook: Your Comprehensive Guide To Mastering Email, Calendar, And Productivity
- Google Flights: Your Ultimate Guide To Finding The Best Airfare Deals
- The Ultimate Guide To Cryptocurrency Trading: Navigating The Digital Frontier
- Binance Coin (BNB): A Comprehensive Overview
Introduction
On this special occasion, we are happy to review interesting topics related to How to Take a Screenshot on Mac: A Comprehensive Guide. Come on knit interesting information and provide new insights to readers.
Table of Content
How to Take a Screenshot on Mac: A Comprehensive Guide

Screenshots are an essential tool for anyone using a computer. Whether you need to capture an error message, save a receipt, share a funny meme, or document a process, knowing how to take a screenshot is invaluable. On a Mac, the process is straightforward and versatile, offering multiple methods to suit different needs. This guide will walk you through everything you need to know about taking screenshots on your Mac.
Why Screenshots Are Important
Before diving into the how-to, let’s briefly cover why screenshots are so useful:
- Documentation: Capture steps in a process for tutorials or guides.
- Communication: Share visual information quickly and easily.
- Troubleshooting: Record error messages or unexpected behavior for technical support.
- Archiving: Save important information displayed on your screen, like receipts or confirmations.
- Sharing: Share interesting or funny content with friends, family, or colleagues.
The Basic Screenshot Shortcuts
macOS provides several built-in keyboard shortcuts for taking screenshots. These are the most common and convenient methods:
-
Capture the Entire Screen:
- Shortcut:
Command (⌘) + Shift + 3 - Function: This shortcut captures the entire screen and saves it as a file on your desktop.
- Result: A PNG file named "Screenshot [year-month-day at time]" will appear on your desktop.
- Shortcut:
-
Capture a Selected Portion of the Screen:
-
Shortcut:
Command (⌘) + Shift + 4 -
Function: This shortcut turns your cursor into a crosshair. Click and drag to select the area you want to capture.
-
Result: When you release the mouse button, a PNG file of the selected area will be saved to your desktop.
-
Pro Tip: While dragging the crosshair, you can:
- Hold
Shiftto constrain the selection to a single axis (horizontal or vertical). - Hold
Optionto resize the selection from the center. - Hold
Spacebarto move the selection without changing its size.
- Hold
-
-
Capture a Specific Window:
-
Shortcut:
Command (⌘) + Shift + 4 + Spacebar -
Function: After pressing
Command + Shift + 4, press the Spacebar. The cursor will change to a camera icon. Move the camera icon over the window you want to capture, and it will be highlighted. Click to capture the window. -
Result: A PNG file of the selected window will be saved to your desktop, including the window’s shadow.
-
Pro Tip: To capture the window without the shadow, hold down the
Optionkey while clicking.
-
Copying Screenshots to the Clipboard
Sometimes, you might want to paste a screenshot directly into an email, document, or image editor without saving it as a file first. You can do this by adding the Control key to the screenshot shortcuts:
-
Copy Entire Screen to Clipboard:
- Shortcut:
Command (⌘) + Control + Shift + 3 - Function: Captures the entire screen and copies it to your clipboard.
- Result: You can then paste the screenshot into any application that supports image pasting (e.g., Mail, Pages, Photoshop).
- Shortcut:
-
Copy Selected Portion to Clipboard:
- Shortcut:
Command (⌘) + Control + Shift + 4 - Function: Allows you to select an area of the screen and copies it to your clipboard.
- Result: Paste the selected area into any application that supports image pasting.
- Shortcut:
-
Copy Specific Window to Clipboard:
- Shortcut:
Command (⌘) + Control + Shift + 4 + Spacebar - Function: Captures a specific window and copies it to your clipboard.
- Result: Paste the window (with or without shadow, depending on whether you hold
Option) into any application.
- Shortcut:
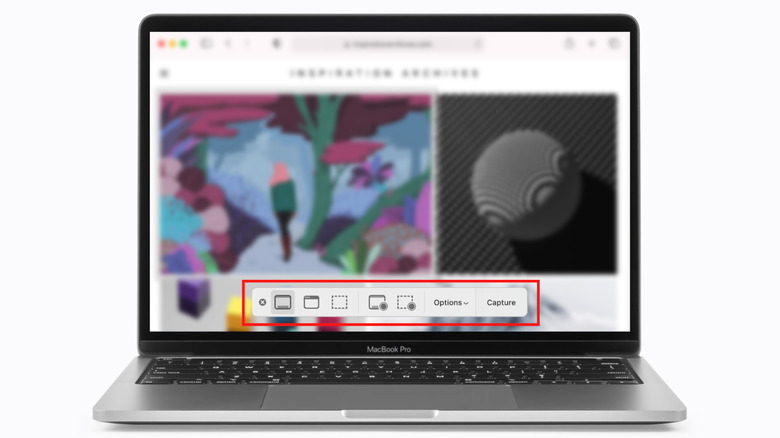
Using the Screenshot App (macOS Mojave and Later)
macOS Mojave (10.14) introduced a dedicated Screenshot app, which provides a more feature-rich interface for taking screenshots and recording screen videos. You can access the Screenshot app using the following shortcut:
- Shortcut:
Command (⌘) + Shift + 5
When you press this shortcut, a small toolbar will appear at the bottom of your screen. This toolbar offers the following options:
- Capture Entire Screen: Takes a screenshot of the entire screen.
- Capture Selected Window: Allows you to select a specific window to capture.
- Capture Selected Portion: Lets you draw a rectangle to capture a specific area.
- Record Entire Screen: Starts recording a video of your entire screen.
- Record Selected Portion: Allows you to select an area to record as a video.
- Options: Provides settings such as:
- Save to: Choose where the screenshots and screen recordings are saved (Desktop, Documents, Clipboard, Mail, Messages, Preview, or Other Location).
- Timer: Set a timer (None, 5 seconds, or 10 seconds) before the screenshot is taken or the recording starts.
- Show Floating Thumbnail: Displays a small thumbnail of the screenshot in the corner of your screen for a few seconds, allowing you to quickly edit or share it.
- Remember Last Selection: Remembers the last selected area for capturing a portion of the screen.
- Show Mouse Clicks in Recording: Shows visual indicators when you click the mouse during screen recordings.
Editing Screenshots
After taking a screenshot, especially with the "Show Floating Thumbnail" option enabled, you can quickly edit it using the Markup tools. Click on the thumbnail that appears in the corner of your screen to open the screenshot in Preview.
Preview provides various tools for editing screenshots, including:
- Crop: Remove unwanted areas of the screenshot.
- Annotate: Add text, shapes, arrows, and signatures.
- Adjust Color: Modify the brightness, contrast, and other color settings.
- Rotate: Rotate the screenshot.
Changing the Default Screenshot File Format
By default, macOS saves screenshots as PNG files. While PNG is a good format for most purposes, you might want to change the default format to JPEG, TIFF, or another format.
To change the default screenshot file format, you can use the Terminal app. Here’s how:
- Open Terminal (located in
/Applications/Utilities/). -
Type the following command, replacing
[file format]with the desired format (e.g.,jpg,tiff,pdf):defaults write com.apple.screencapture type [file format]For example, to change the format to JPEG, you would type:
defaults write com.apple.screencapture type jpg - Press Enter.
-
Restart the SystemUIServer process for the changes to take effect. You can do this by typing the following command and pressing Enter:
killall SystemUIServer
To revert to the default PNG format, use the following command:
defaults write com.apple.screencapture type png
killall SystemUIServer
Changing the Default Screenshot Location
By default, macOS saves screenshots to the desktop. You can change this default location using the Terminal app as well:
- Open Terminal.
-
Type the following command, replacing
[path to folder]with the full path to the folder where you want to save screenshots:defaults write com.apple.screencapture location [path to folder]For example, to save screenshots to a folder named "Screenshots" in your Documents folder, you would type:
defaults write com.apple.screencapture location /Users/[your username]/Documents/ScreenshotsReplace
[your username]with your actual username. - Press Enter.
-
Restart the SystemUIServer process:
killall SystemUIServer
To revert to the default Desktop location, use the following command:
defaults delete com.apple.screencapture location
killall SystemUIServer
Troubleshooting Screenshot Issues
If you encounter problems taking screenshots, here are some common issues and solutions:
- Screenshots Not Saving:
- Make sure you have enough free space on your hard drive.
- Check the default save location to ensure it’s accessible.
- Verify that the SystemUIServer process is running correctly (restart your Mac if necessary).
- Keyboard Shortcuts Not Working:
- Ensure that the keyboard shortcuts are not being used by another application.
- Check your keyboard settings in System Preferences to make sure the shortcuts are enabled.
- Try restarting your Mac.
- Screenshot App Not Opening:
- If the Screenshot app (Command + Shift + 5) isn’t opening, try restarting your Mac.
- Check for macOS updates, as the issue might be resolved in a newer version.
- Cursor Not Appearing in Screenshots:
- By default, the cursor is not included in screenshots. There are third-party apps that allow you to capture the cursor, or you can use the annotation tools in Preview to add a cursor manually.
- Screenshots are Black or Blank:
- This can sometimes occur when taking screenshots of DRM-protected content. There is no easy fix for this, as it is a security measure implemented by the content provider.
Third-Party Screenshot Tools
While macOS provides excellent built-in screenshot capabilities, some users might prefer to use third-party screenshot tools for additional features and customization options. Here are a few popular options:
- Snagit: A powerful and feature-rich screenshot and screen recording tool with advanced editing capabilities.
- CleanShot X: A lightweight and versatile screenshot tool with cloud storage and annotation features.
- Lightshot: A free and simple screenshot tool with basic editing and sharing options.
- Skitch: An annotation and sharing tool by Evernote that can also take screenshots.
Conclusion
Taking screenshots on a Mac is a simple yet powerful skill. By mastering the keyboard shortcuts and understanding the Screenshot app, you can easily capture and share visual information. Whether you need to document a process, communicate an idea, or troubleshoot a problem, screenshots are an invaluable tool in your digital toolkit. Don’t hesitate to explore the advanced features and customization options to tailor the screenshot experience to your specific needs.